
Wooden cricket bats, furniture pieces, tool handles, and handcrafted wooden products can develop cracks over time due to repeated impact, environmental changes, moisture fluctuations, and general wear. Among the most common issues are surface cracks, deeper structural cracks, and toe splitting. If left untreated, these problems can worsen, reducing durability and potentially causing complete failure of the wooden item.
Fortunately, wood glue and twine provide a simple, affordable, and effective repair method. When properly applied, this combination helps reinforce weakened areas, stabilize splits, and extend the life of the wood. This guide explains how to identify damage and repair cracks step by step using wood glue and twine.
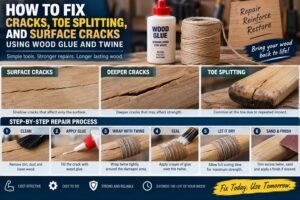
Understanding Different Types of Cracks
Before beginning repairs, it is important to identify the type of damage.
Surface Cracks
Surface cracks are shallow fractures that affect only the outer layer of the wood.
Common causes include:
- Dry conditions
- Natural aging
- Minor impacts
- Temperature fluctuations
These cracks are typically cosmetic but can spread if ignored.
Structural Cracks
Structural cracks penetrate deeper into the wood and may affect strength and stability.
Typical causes include:
- Heavy impact
- Excessive pressure
- Repeated use
- Moisture expansion and contraction
These cracks require more substantial reinforcement.
Toe Splitting
Toe splitting occurs at the bottom end of the wood, particularly common in cricket bats and wooden tools exposed to repeated impact.
Causes include:
- Contact with hard surfaces
- Improper storage
- Moisture penetration
- Continuous stress during use
Toe damage is particularly important to repair quickly because it can spread rapidly.
Why Use Wood Glue and Twine?
The combination of wood glue and twine offers several benefits.
Wood Glue Benefits
- Creates a strong bond
- Penetrates small cracks
- Restores structural integrity
- Dries clear on many surfaces
Twine Benefits
- Acts as external reinforcement
- Prevents crack expansion
- Adds stability during the curing process
- Provides additional long-term support
Together, they form a reliable repair system that is easy to apply.
Materials Required
Gather the following supplies before starting:
- High-quality wood glue
- Natural cotton twine or strong jute twine
- Fine-grit sandpaper
- Clean cloth
- Utility knife
- Small brush or applicator
- Clamps (optional)
- Protective gloves
- Wood filler (optional for larger cracks)
Having all materials ready ensures a smooth repair process.
See More:
Preparing the Damaged Area
Proper preparation is essential for a successful repair.
Step 1: Clean the Surface
Remove:
- Dirt
- Dust
- Loose wood fibers
- Old adhesive residue
Use a dry cloth or soft brush.
A clean surface allows better glue penetration.
Step 2: Inspect the Damage
Carefully examine:
- Crack length
- Crack depth
- Areas of weakness
- Additional hidden splits
Mark any sections requiring reinforcement.
Step 3: Lightly Sand the Area
Gently sand around the crack using fine-grit sandpaper.
Benefits include:
- Improved glue adhesion
- Removal of loose fibers
- Smoother repair finish
Avoid excessive sanding that may enlarge the crack.
Repairing Surface Cracks
Surface cracks are generally the easiest to repair.
Step 1: Open the Crack Slightly
Use gentle finger pressure to expose the crack.
Do not force it wider than necessary.
Step 2: Apply Wood Glue
Using a brush or applicator:
- Fill the crack thoroughly
- Ensure glue reaches the entire depth
Take your time to eliminate air pockets.
Step 3: Remove Excess Glue
Wipe away excess adhesive using a damp cloth.
This prevents visible glue marks after drying.
Step 4: Let the Glue Cure
Allow the repair to dry according to the manufacturer’s recommendations.
Avoid handling the wood during this period.
Step 5: Sand and Finish
Once dry:
- Sand lightly
- Smooth the repaired area
- Apply finish if desired
The crack should now be sealed and stabilized.
Repairing Deeper Structural Cracks
Larger cracks require reinforcement for long-term reliability.
Step 1: Fill the Crack with Glue
Inject wood glue deeply into the damaged section.
Ensure complete coverage.
Step 2: Clamp the Area
Use clamps to bring the cracked edges together.
Apply even pressure.
Do not overtighten.
Step 3: Wrap with Twine
While the glue remains workable:
- Begin wrapping twine around the damaged section
- Maintain consistent tension
- Cover the entire crack area
The twine acts as a compression band.
Step 4: Add More Glue
Apply a thin layer of glue over the twine.
This bonds the reinforcement to the wood surface.
Step 5: Allow Complete Drying
Leave undisturbed until fully cured.
Complete curing produces the strongest repair.
See More: Step-by-Step Guide: Manual Knocking vs. Using a Ball Mallet
Fixing Toe Splitting with Wood Glue and Twine
Toe splitting requires extra attention because it receives significant stress.
Step 1: Clean the Split
Remove:
- Dirt
- Grass particles
- Dust
- Loose wood fragments
A clean toe allows maximum bonding strength.
Step 2: Open the Split Carefully
Separate the split slightly to allow glue penetration.
Use minimal force.
Step 3: Fill with Wood Glue
Inject glue deeply into the split.
Work slowly to ensure full coverage.
Step 4: Compress the Toe
Press the split together firmly.
If necessary, use a clamp.
Step 5: Wrap the Twine Tightly
Starting just above the split:
- Wind the twine downward
- Continue around the toe section
- Maintain even pressure
The wrapping should be snug but not excessively tight.
Step 6: Seal the Twine
Apply another layer of wood glue over the wrapped twine.
This creates a reinforced protective shell.
Step 7: Allow Full Curing
Leave the repair untouched until completely dry.
This ensures maximum strength and stability.
Finishing the Repair
Once the glue has cured, finish the repair to improve appearance and durability.
Sand the Surface
Lightly sand rough areas until smooth.
Trim Excess Twine
Use a sharp utility knife to remove loose ends.
Apply a Protective Finish
Optional finishes include:
- Linseed oil
- Wood conditioner
- Protective sealant
- Furniture wax
These treatments help protect against moisture and future cracking.
Common Mistakes to Avoid
Many repairs fail because of simple mistakes.
Avoid:
Using Too Little Glue
Incomplete coverage weakens the repair.
Wrapping Loose Twine
Loose reinforcement provides minimal support.
Rushing the Drying Process
Insufficient curing significantly reduces bond strength.
Ignoring Small Cracks
Minor cracks often develop into major structural issues.
Over-Sanding
Excessive sanding can weaken the repaired area.
Preventing Future Cracks and Splits
Prevention is often easier than repair.
Store Properly
Keep wooden items in a dry, stable environment.
Avoid Extreme Temperatures
Rapid temperature changes can stress wood fibers.
Protect Against Moisture
Use sealants or oils when appropriate.
Inspect Regularly
Frequent inspections allow early detection of damage.
Reinforce High-Stress Areas
Applying preventive twine reinforcement to vulnerable sections can reduce future splitting.
Benefits of the Wood Glue and Twine Repair Method
This technique remains popular because it is:
- Affordable
- Easy to perform
- Reliable
- Suitable for beginners
- Effective for various wood types
- Useful for both cosmetic and structural repairs
When performed correctly, repairs can significantly extend the life of wooden equipment and products.
Conclusion
Cracks, surface fractures, and toe splitting are common problems that can weaken wooden items over time. By combining high-quality wood glue with strong twine reinforcement, you can create durable repairs that restore stability and prevent further damage. Whether you are fixing a cricket bat toe, stabilizing a deep structural crack, or repairing minor surface splits, following a careful step-by-step approach ensures the best results. With proper maintenance and timely repairs, wooden products can continue performing reliably for many years.